- home
- BAKERECIPES
BakeRecipes
Bringing real baking into your home with deliciously simple recipes.
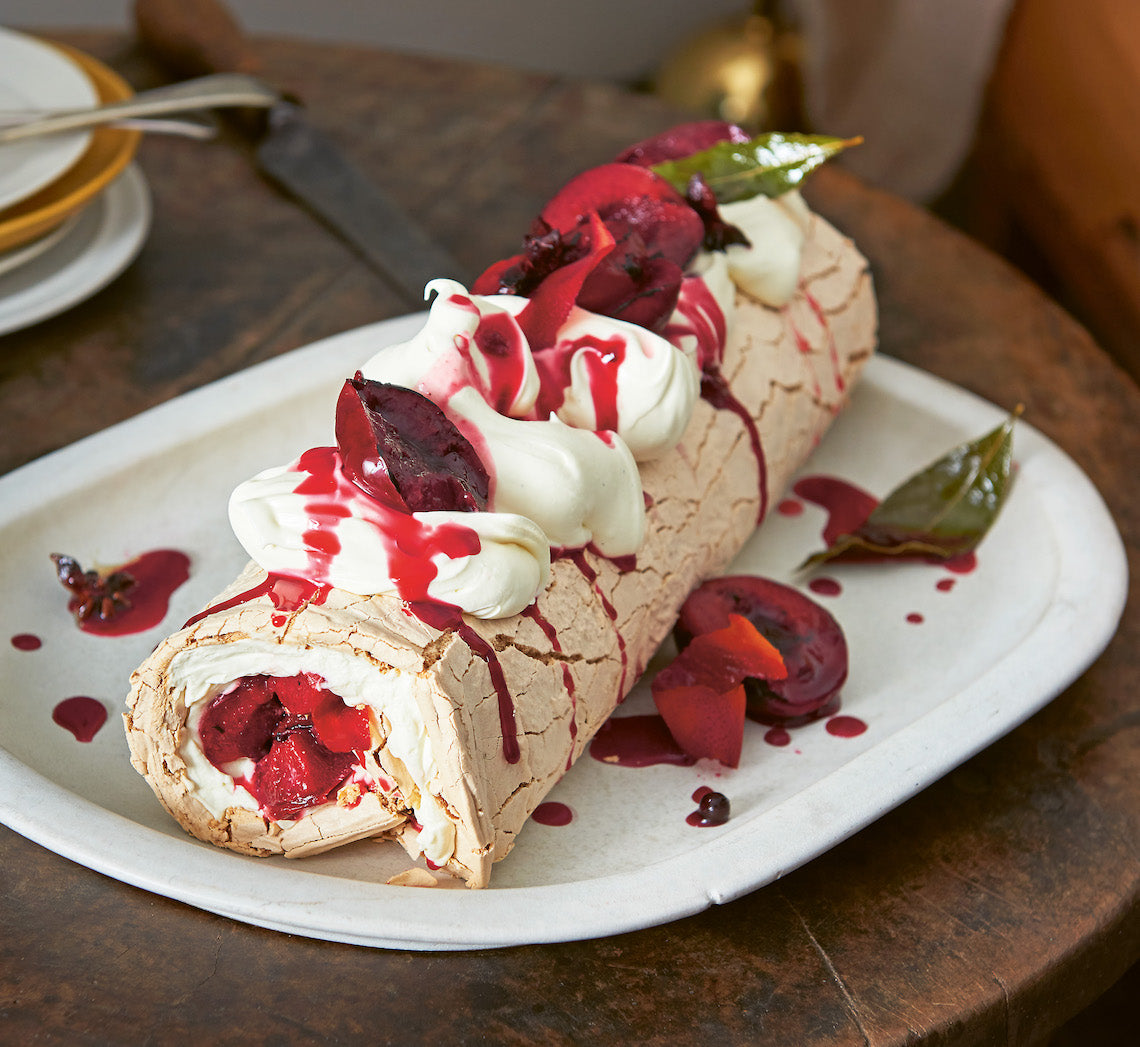
Takes 2hr (+30min for the fruit)Makes a cake for 6–8 and approximately 800g (1lb 12oz) fruit and syrup
Coconut Sugar Pavlova Roll
Reasons why my meringue preference is for a roll over a classic dome: 1. The crust quotient (CQ) is higher. More crunch balances the soft inside and creamy parts. 2. No shaping surprises with a flat pavlova. The proud dome you shape with meringue can sometimes end up baking into an askew beret! 3. Faster! No slooowww cool down keeping you from putting a slice of pavlova on your plate a minute longer than necessary.
Ingredients
Cooking oil spray
300g (10½oz) caster (superfine) sugar
70g (2½oz) coconut sugar
5g (⅛oz/½ teaspoon) vanilla paste
5g (⅛oz) cornflour (cornstarch)
5g/ml (⅛oz) white or apple-cider vinegar
2g (¹⁄₁₆oz/¼ teaspoon) fine sea salt
225g (8oz) egg white (from approx. 12 eggs)
2g (¹⁄₁₆oz/¼ teaspoon) cream of tartar
600g/ml (1lb 5oz) cream (45% milkfat)
1 × batch Spiced Grilled Blood Plums (below), chilled
Method
- Preheat the oven to 140°C (285°F). Lightly spray a flat and heavy 30cm × 40cm (12in × 15¾in) shallow baking tray with cooking oil, then lay a piece of baking paper on the tray, to cover the entire surface. Don’t spray again.
- Weigh the caster sugar into a small bowl with a small scoop. Weigh the coconut sugar separately. Next, weigh the vanilla, cornflour vinegar and salt together and stir together, then set aside. Coconut sugar impedes getting a stiff meringue structure, so we will add it at the end – when the meringue is strong.
- Put the egg white and cream of tartar in the bowl of an electric stand mixer. Using the whisk attachment, whip on speed 8 (under high) for 3–5 minutes. Once the whites have changed from foamy to stiff and white, start adding the caster sugar, 1 tablespoon at a time, over 3 minutes to make a very shiny and rigid meringue.
- Turn the mixer off and add the coconut sugar. Slowly turn the mixer on, increasing up to speed 8 (under high) for 5 seconds. Stop the mixer and add the cornflour/vinegar mixture. Re-whip for 5 seconds. Take the bowl off the mixer and use your fingers to push the meringue off the whisk back into the bowl. Give it a final and thorough mix with a plastic spatula so the colour is a uniform pale malt brown. Don’t worry that the meringue has sugary speckles.
- Scrape the mix out onto the prepared baking tray. Using an offset spatula, smooth it evenly over the tray, leaving a 1.5cm (½ in) border around the edges to allow for some expansion during baking. Bake for 1 hour until the top feels like a crunchy pillow that cracks when gently pressed. Remove and allow to cool at room temperature on the tray, until ready to roll (see Baker's Tips). Moving it off the tray while it’s hot makes the sheet prone to breaking.
- While the meringue cools, whip the cream to billowy soft and cut most of the grilled plum pieces into smaller pieces (four pieces per plum half). Reserve a few slices or whole pieces for the top.
- To roll, lay two overlapping pieces of plastic wrap on the work surface to make a sheet slightly larger than the meringue sheet. Carefully flip the meringue sheet off the tray, with the shortest side closest to you, and peel off the baking paper. The meringue should now be crunchy top side down and the underside, now exposed, should feel soft and a little sticky.
- Keeping the short side closest to you, evenly spread 400g (14 oz) of the cream over the meringue, but only smooth a light smear over the 2cm (¾ in) strip at the top of the sheet. This will become the seal, so it’s best not to overload it with cream that will ooze out upon rolling. Scatter the grilled plums evenly over the cream (except for the strip along the top). Tear the pieces up a little if they are too big, as big pieces make a lumpy roll.
- Take a firm hold of the plastic wrap closest to you and use a repetitive ‘lift and roll’ motion to gradually roll the meringue, until you do a final full roll to reach the end, with the seam underneath. Form a spine of reserved cream then plum pieces. Drizzle the reserved syrup on top.
Baker's Tips
-
Takes: Two hours from start to serve. Or you can bake the meringue sheet the day before and fill the next day
- Keeps: Always best served just after rolling. When filled, this will keep refrigerated for 1 day, well covered or in an airtight container. Unfilled, the meringue will hold for up to 3 days, but give it a 10 minute re-crisp in a 140°C (285°F) oven, then cool before filling.
- Overbaked meringue will be uber-crisp and unbending, threatening to snap. To repair, place the cream and fruit on the sheet and chill for an hour, then roll. If your meringue is underbaked, bake the meringue sheet for another 20 minutes at 140°C (285°F), even if you do this the day after. If the sheet has cracked irreparably, stack large shards with the cream and fruit in an avant-garde (but totally meant it) way.
Adaptrix
Other fruit:
- Use a similar weight of raspberries or strawberries in place of the plums. The Sumac blackberries are also incredible here!
- Toffeed bananas are a year-round fruity friend … and add fresh passionfruit to bring the zing.
- Roasted quinces or toffee figs are my autumnal go-to, and coconut is such a bosom buddy to them both. With quince, this roulade is beyond next level.
Spiced Grilled Blood Plums
These plums are another example of Christine Manfield’s (tysm) dessert genius! The grill char imparts a seductive smokiness. The syrup floods them while warm and they absorb all the honey sweetness and glorious spices and fresh citrus zing. These plums love to be served with chocolate mousse, panna cottas or store-bought gelato. I can’t help falling in love with this recipe every time the syrup sizzles on the fruit.
Ingredients
750g (1lb 11oz) blood plums, still firm, not yieldingly ripe (around 8)
30g (1oz) demerara sugar
Spiced syrup
1 orange
1 lemon
100g (3½oz) caster (superfine) sugar
40g (1½oz) honey
40g/ml (1½oz) cold water
4 star anise
2 whole allspice berries few grinds black pepper
1–2 fresh bay leaves (optional)
Method
- To start the spiced syrup, peel four wide strips each from the orange and the lemon and place into a small, non-reactive saucepan. Set the fruit aside (you’ll add their juice to the syrup later).
- Add the remaining syrup ingredients to the saucepan. Bring to the boil over a medium–high heat, stirring at first to loosen the sugar. When it boils, turn it down to a simmer and cook for 3–4 minutes until syrupy like maple syrup. Remove from the heat and cool to room temperature.
- While the syrup cools, heat your grill (broiler) to High (100%). Cut the plums in half, following their natural seam. Twist and pull apart and remove the stone (if it doesn’t prise out easily, cut around it with a small, pointy knife). Place the plums, cut-side up, on a non-reactive, ovenproof, shallow-lipped tray (or line a tray with foil). Sprinkle the demerara sugar evenly over the plums, then grill for 10–12 minutes, until the cut side has blistered and some have a collar of blackened flesh (see Baker's Tips).
- Remove the plums from the grill. Squeeze the juice from the orange and lemon into the syrup and pour over the plums. Adding the juice when the syrup has cooled will retain the fresh acidity. Overheated juice loses vibrancy.
- Allow to stand for 30 minutes, turning once in the syrup. Cool to room temperature before using.
Baker's Tips
- Takes: 30 minutes. Can be served warm or cool to fill the Coconut sugar pavlova roll
- Keeps: Chilled for up to 4 days. Can be frozen after that and defrosts pretty well!
- If you don’t have a grill, halve the plums, remove the stones and set in a baking tray. Scatter the sugar on the cut sides and caramelise with a blowtorch until dark brown. If the plums are large and still firm, bake for 10–15 minutes in a 180°C (360°F) oven until they soften but hold their shape.
Adaptrix
Peaches, nectarines
- Substitute in any peak-season ripe stone fruit. Exclude apricots from grilling – they need a gentle and less scorching treatment.
This is an edited extract from Beatrix Bakes: Another Slice by Natalie Paull (Hardie Grant Books, RRP $50.
Photographer: © Rochelle Eagle 2024
You can read more about what Natalie is baking this winter here.
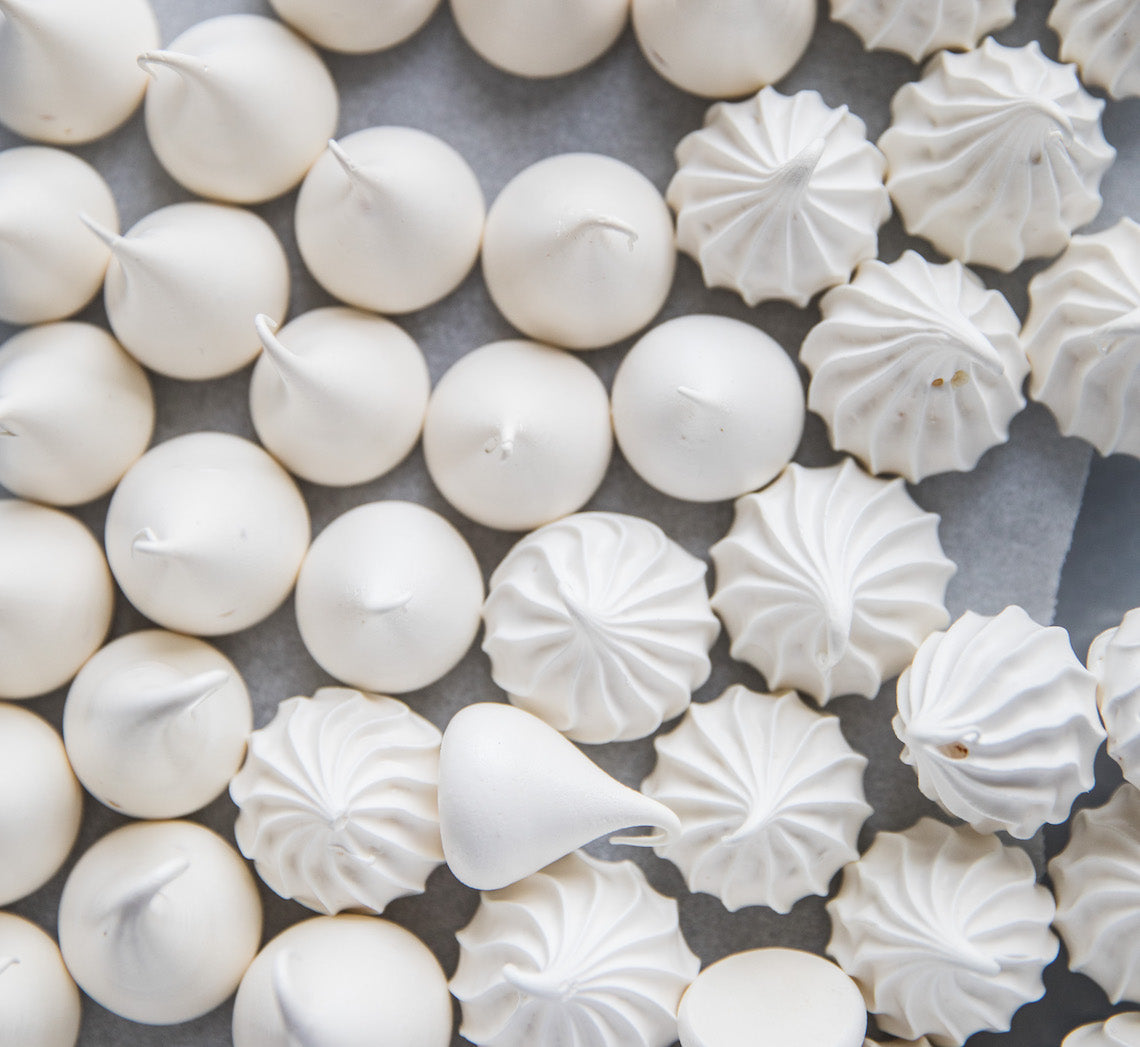
Prep 40min (+1-2hr cooling time)Bake 1hr-1hr10minMakes about 50
Ingredients
2 egg whites (from 60g/2oz eggs)
110g (½ cup/4oz) caster sugar
1 teaspoon natural vanilla essence or extract
2 teaspoons gluten-free cornflour, sifted
Method
- Preheat oven to 110°C/230°F (90°C/195°F fan-forced). Line an oven tray with non-stick baking paper.
- Combine the egg whites and sugar in a medium heatproof bowl (preferably metal) and place over a saucepan of simmering water, ensuring the bowl doesn’t touch the water. Stir with a spatula or small whisk until the sugar dissolves and the mixture is hot to touch (about 55-60°C on a sugar thermometer). Be careful not to allow the egg whites to cook.
- Transfer the egg white mixture to the bowl of an electric mixer (see Baker’s Tips). Whisk the egg white mixture with a whisk attachment on medium-high speed until very thick and glossy and the mixture has cooled to room temperature. Whisk in the vanilla and cornflour.
- Fill a large piping bag fitted with a 4B star (or #11/11mm/½in round) piping nozzle with the meringue mixture. Holding the piping nozzle about 1cm/½in above the tray, pipe small rosettes (or 'kisses') about 2.5cm/1in in diameter and 2cm apart on the lined tray.
- Bake in a preheated oven for 60-70 minutes or until the meringues are crisp, hard to touch and peel away from the tray easily, but are not coloured.
- Remove the meringues from the oven and place immediately in an airtight container lined with absorbent paper
Variations
- Striped Meringue Kisses: Use a paintbrush to lightly brush evenly spaced vertical lines of food colouring gel on the inside of the large piping bag before spooning the meringue mixture into the piping bag. Continue as per the recipe.
Baker's Tips
- The fan-forced setting is often too intense for baking meringues and will cause them to crack. If this is the case with your oven, opt for the conventional setting. However, if the meringues do crack when using the convention setting, your oven may be running a little hot and next time reduce the temperature by 5-10°C (41-50°F) as this will often help prevent them from cracking.
- If you don't have a small bowl for your mixer, first whisk the egg white mixture with a balloon whisk until it is foamy and doubled in volume before whisking with the stand mixer. This will make the whisking of the egg white mixture more efficient in a standard size bowl.
- Allowing the egg white mixture to come to room temperature before whisking will reduce the time it will take to whisk it to a meringue.
- These meringues will keep in an airtight container at room temperature for up to 1 week.
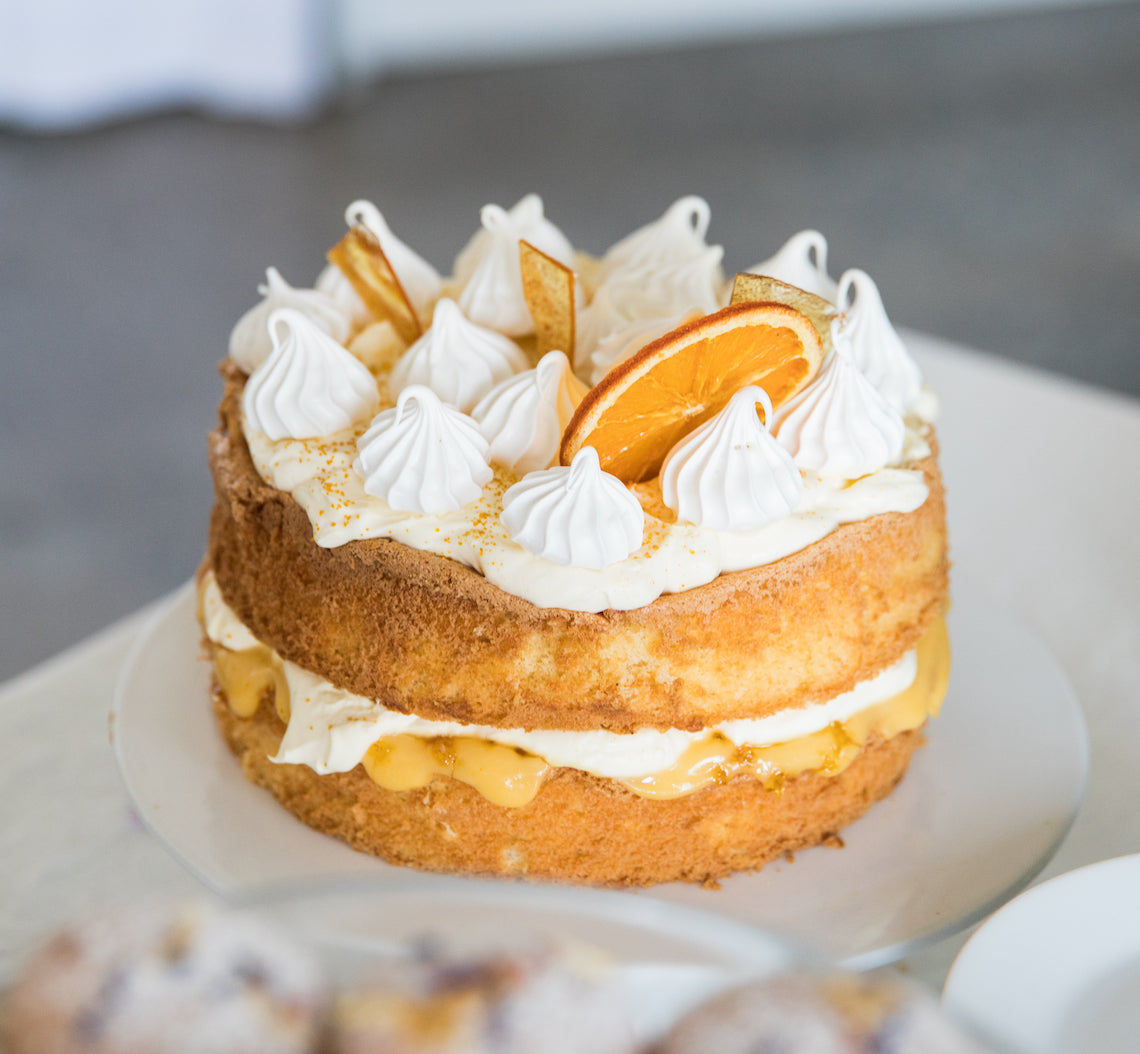
Prep 1.5hr (+ Meringue Rosettes prep)Bake 18-20minMakes 8-10 serves
An absolute must-try for any citrus fan, this light-as-air cake is the ultimate balance between light sponge, mouth-puckering lemon curd and beautiful hand-made adornments.
Created by Make Me a Baker student, Cate Tibbertsma for her graduation, this cake is a nostalgic one "that will fill your belly with sweet memories" as Cate says.
Ingredients
125ml (½ cup) thickened cream
125g (½ cup) sour cream
1 tablespoon pure icing sugar, sifted
1 teaspoon Citrus Dust (see recipe below), plus extra to sprinkle
Meringue Rosettes (get Cate's meringue recipe HERE), to decorate
Oven-dried orange slices (optional), to decorate
Lemon Curd
2 eggs, at room temperature
2 egg yolks, at room temperature
165g (3/4 cup) caster sugar
80g unsalted butter, diced
2 lemons, zest finely grated and juiced
Sponge Layers
Melted butter to grease
4 fresh eggs, at room temperature
1½ teaspoons natural vanilla essence or extract
165g (3/4 cup) caster sugar
60ml (1/4 cup) milk
30g butter, diced
110g (3/4 cup) self-raising flour
30g (1/4 cup) cornflour
Citrus Syrup
110g (½ cup) caster sugar
60ml (1/4 cup) strained fresh lemon juice
60ml (1/4 cup) strained fresh orange juice
Citrus Toffee Shards
Oil spray
100g caster sugar
2½ tablespoons water
1 tablespoon liquid glucose
½ teaspoon Citrus Dust (see recipe below), to sprinkle
Lemon Curd
- Combine the whole eggs, yolks and sugar in a small saucepan and stir with a whisk until smooth. Add the butter and the lemon juice and zest.
- Place the saucepan over a low heat and stir constantly with the whisk until thickened and the mixture reaches 75°C on a sugar thermometer.
- Strain through a sieve into a sterilised jar or glass container with lid. Refrigerate until required (see Baker’s Tips).
Citrus Toffee Shards
- Line a baking tray with non-stick baking paper and spray lightly with oil; set aside. Combine the caster sugar, water and the liquid glucose in a small saucepan. Stir over a low heat until the sugar dissolves. Stop stirring when it starts to boil and brush down the inside of the saucepan with a wet pastry brush to dissolve any crystals that have formed on the surface. Boil until the syrup turns a dark caramel colour (see Baker's Tips).
- Immediately pour the caramel over the entire surface of the baking sheet to create a thin layer. Sprinkle with the Citrus Dust. Set aside to cool and set. When completely cool, transfer to a sealed airtight container together with the baking paper.
Sponge Layers
- Position the oven rack in the middle of the oven and then preheat it to 180°C (160°C fan-forced). Brush two 18cm springform tins with melted butter to grease and line the base of each with a sheet of non-stick baking paper. Combine butter and milk in a small saucepan and set aside. Combine the Citrus Syrup ingredients in a separate small saucepan and set aside also.
- Use an electric mixer with a whisk attachment on medium-high speed to whisk the eggs and vanilla in a medium bowl until frothy. Add the sugar a spoonful at a time, whisking well between each addition, until the mixture is very thick and pale and the sugar has dissolved (this will take about 8 minutes). Lift the whisk out of the mixture and slowly draw a figure eight, if the trail stays on the surface long enough for you to finish drawing then the mixture is ready. If not, continue to whisk for a further minute and then test again.
- Meanwhile, heat the milk and butter in a small saucepan over medium heat until the butter melts and the mixture is almost simmering. Remove from the heat. Pour the hot milk mixture down the side of the bowl and then sift the flour and cornflour together over the egg mixture. Immediately whisk briefly again with the electric mixer on low speed, until the flour mixture is just incorporated (make sure there is no flour caught at the bottom of the bowl and be careful not to over mix).
- Divide the mixture evenly between the cake tins (see Baker's Tips) and gently tap the tins on the bench top three times to settle the mixture. Bake in preheated oven for 18-20 minutes or until the cakes are a pale golden colour, spring back when lightly touched in the centre and start pulling away from the sides of the tins.
Citrus Syrup
- About 5 minutes before the Sponge Layers finish baking, place the saucepan with the Citrus Syrup ingredients over a medium heat and stir until the sugar dissolves. Bring to a boil then reduce to a very gentle simmer to keep warm.
- Remove sponges from the oven and immediately use a small palette knife to loosen the top of the sponges from the tins and turn onto a wire rack lined with a tea towel. Remove the baking paper and carefully turn the hot sponges back on their base onto a rack over a tray. Immediately pour hot syrup over the hot sponge layers. Set aside to cool completely before layering.
To Assemble
- Use an electric hand mixer with a whisk attachment or a balloon whisk to whisk the thickened cream, sour cream and icing sugar together in a medium bowl, until soft peaks form.
- Place one sponge layer on a serving plate or cake stand. Spread about 1/2 cup of curd over the sponge layer and use a small sieve to sprinkle the Citrus Dust over the curd. Spread about half the cream mixture over the curd layer, spreading gently to avoid over-working the cream. Top with the remaining sponge layer. Spread another 1/2 cup of curd on top followed by the remaining cream mixture, again spreading gently so you don’t over work it.
- Decorate with the Meringue Rosettes and Citrus Toffee Shards and sprinkle with extra Citrus Dust. Embellish with oven-dried orange slices, if desired. Serve immediately or refrigerate for up to 2 hours (see Baker's Tips).
ORANGE CITRUS DUST: Preheat oven to 100°C (80°C fan-forced). Use a vegetable peeler to peel the rind from 1 large orange. Use a small knife to scrap any excess pith away. Place on a lined oven tray and bake in oven for 1-2 hours. Rind is ready when it has dried completely but still retains some of its original colour. Use a mortar and pestle or a small food processor to pound or process the rind to a fine powder that is aromatic and rich in colour. Store in an airtight container in a cool dry place for up to one month.
Baker's Tips
- The Lemon Curd will keep in a sealed clean, sterilised jar for up to 2 weeks in the fridge. My preference is to make and refrigerate the lemon curd 1-2 days in advance of using it so that the curd thickens and the flavour develops.
- As the Citrus Toffee Shards syrup begins to darken, gently turn the pan to encourage the colour to spread but avoid swirling the mixture too vigorously to prevent the mixture from crystallising.
- The Citrus Toffee Shards will store at room temperature in an airtight container for up to a month, depending on the humidity.
- Having your butter and milk mixture for the Sponge Layers and the Citrus Syrup ingredients in separate saucepans, ready for heating, will make the preparation of this recipe more efficient and with help with the timing of when the different elements need to be ready.
- To divide the mixture evenly between the tins, weigh the tins with the mixture in them to make sure they are the same weight. Placing a small upturned bowl on the scale and for the cake tin to sit on will mean that the measurement display window can be easily viewed.
- Even though this cake is best eaten on the day it is baked, the unfilled syrup-infused sponge layers can be made the day before serving. Store in an airtight container at room temperature. To avoid the layers sticking to each other, separate the sponges with a layer of baking paper or store in two separate airtight containers. An upturned cake tin, larger than the diameter of the cake, also makes a useful barrier for separating sponges for storing.
- To ensure this cake cuts easily, resist over-filling the middle layer of curd and cream and, if possible, chill the assembled cake for a few hours before serving. Decorate with the meringues, toffee shards and citrus dust just before serving.
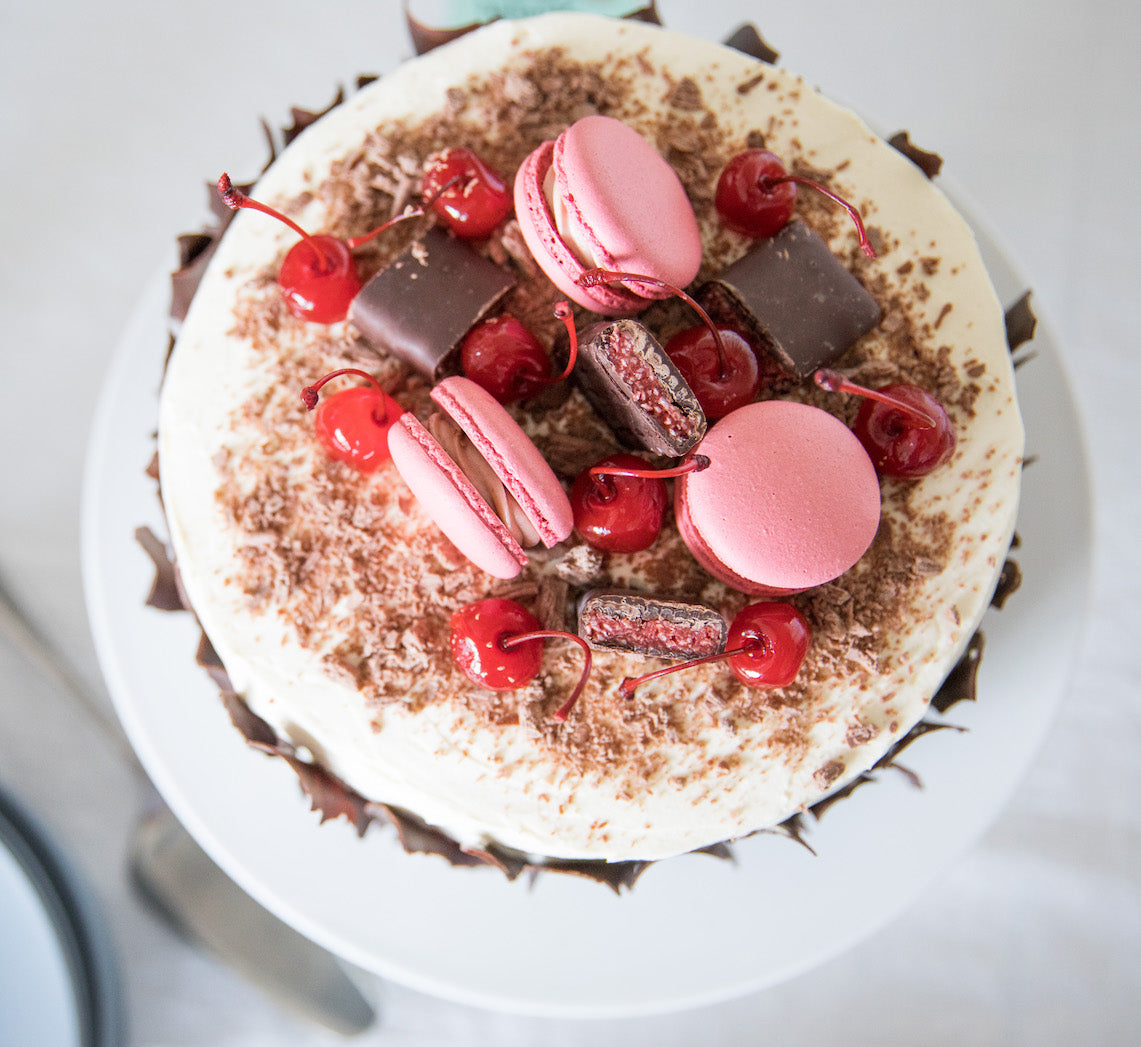
Prep 11/2hr (+ standing time) Bake 15min (per batch) Makes about 28
Pretty to look at, divine to eat, these macarons were created by Allen Au, one of our Make Me a Baker graduates, to use as part of his Graduation cake recipe.
Ingredients
125g almond meal
125g pure icing sugar
96g egg whites
125g caster sugar
30ml water
Gel colouring (see Baker's tip)
Filling
125g unsalted butter
125g pure icing sugar, sifted
1 tablespoon sieved cherry jam
Method
- Preheat oven to 165°C (145°C fan-forced). Line two large oven trays with non-stick baking paper or silicone baking mats.
- Sift together the almond meal and icing sugar into a large bowl. Add half the egg white and mix until a thick paste forms.
- Combine the caster sugar and water in a small saucepan and stir over medium heat until the sugar dissolves. Bring to a boil and simmer over medium heat, brushing down the sides of the saucepan with a wet pastry brush occasionally to prevent any sugar crystals forming. Do not stir. Once the sugar mixture has reached 115°C on a sugar thermometer, use an electric mixer with a whisk attachment to whisk the remaining egg white on medium-high speed until soft peaks form. Once the sugar mixture has reached 118°C, remove the saucepan from the heat and slowly whisk the hot sugar mixture into the egg whites. Continue to whisk on medium-high speed until the temperature cools to 30°C. The meringue should be thick and glossy. Add enough gel colour to the meringue to tint to the desired colour, whisking until evenly combined.
- Fold 2 large tablespoons of the meringue into the almond paste mixture until well incorporated. Fold in the remaining meringue until evenly combined. The consistency of the batter should look like molten lava. If you can draw a figure eight and the trail stays on the surface, then the mixture is ready to be piped.
- Spoon the mixture into a piping bag fitted with a 10mm round nozzle. Pipe the macarons onto the lined trays into 3.5cm rounds. Tap the tray to remove any air bubbles from the macarons. Leave the macarons out in the open until a skin forms on the surface of the macaron. (This can take from 20 minutes to an hour depending on the humidity). The skin should be dry enough that it does not stick to your finger when touched lightly.
- Bake one tray of macarons in the centre of the preheated oven for 15 minutes or until shells don't feel soft at the 'feet' when touched. Set aside to cool on the tray and repeat with the remaining tray of macarons.
- To make the Filling, use an electric mixer to beat the butter until it is pale and creamy. Beat in the icing sugar until well combined. Add the cherry jam and beat until well combined. Spoon the filling into a piping bag fitted with a 7mm star nozzle and pipe a small rosette onto the base of half the macarons. Sandwich with the remaining macarons.
- Store the macarons in the fridge overnight so the flavours from the filling are absorbed by the shells. Bring the macarons to room temperature before serving.
Baker's Tips
- Allen used Chefmaster Liqua-Gel colours to colour his macarons – he used 8 drops of Super Red with 0.5 drop of Black Diamond
- This recipe is based on a recipe from a course Allen did with Australian Patisserie Academy
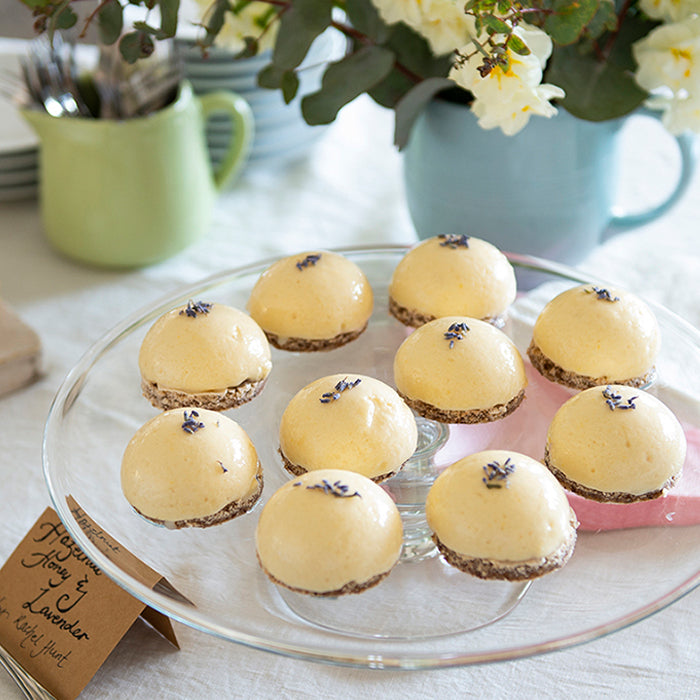
Prep 2 hours (+ 4 hours chilling time)Bake 30-40 minMakes 18 serves
These divine desserts petite gateaux were created by Rachel Hunt, one of our Make Me a Baker students for her graduation. A crisp, nutty, meringue base is topped with a mirror-glazed, ever-so-light honey-infused mousse surrounding a floral lavender jelly. Using a number of techniques, this recipe showcases all the fantastic new skills and confidence Rachel gained over the course of our 6-month program and, lucky for you, she’s sharing it so you can make them at home! Rachel uses 18 x 30mm and 60mm (top measurement) half sphere silicon moulds however other shapes/sizes can be used.
Ingredients
Lavender Jelly- 6 fresh unsprayed lavender heads or 2 teaspoons
dried culinary lavender, plus extra to decorate - 250ml (1 cup) water
- 110g (1/2 cup) sugar
- 1½ teaspoons powdered gelatin
- 2½ tablespoons cold water
- Purple food colour (optional)
- 5 eggs, separated
- 40g butter, diced
- 135g good-quality white chocolate chips (like Callebaut)
- 60ml (¼ cup) good-quality honey
- 2 teaspoons powdered gelatin
- 2 tablespoons cold water
- 300ml thickened cream
Hazelnut Meringue
- Vegetable oil, to grease
- 150g hazelnut meal or peeled toasted hazelnuts
- 7 large egg whites
- ½ teaspoon white wine vinegar
- 385g (1¾ cups) caster sugar
Mirror Glaze
- 2 tablespoon powdered gelatin
- 250ml (1 cup) cold water
- 330g (1½ cups) caster sugar
- 160ml (2/3 cup) sweetened condensed milk
- 2 cups good-quality white chocolate chips (like Callebaut)
Method
- To make the lavender jelly, combine the sugar and 250ml water in a small saucepan and stir over a low heat until sugar dissolves. Bring to the boil. Remove from the heat and add the lavender. Set aside to cool to room temperature.
- When the syrup is almost cool, place the cold water in a small heatproof bowl or dish and sprinkle the gelatin over. Set aside for 5 minutes or until the gelatin is fully rehydrated. Sit the bowl or dish into another bowl of hot water and stir until dissolved and the mixture is clear.
- Strain the jelly syrup through a sieve to remove the lavender. Transfer the gelatin mixture to a medium bowl and stir in the syrup until well combined.
- Tint the jelly syrup with purple food colouring if desired. Place 18 x 30mm (top measurement) half-sphere silicon moulds on a tray and pour in the jelly syrup (there will be some syrup left over and you can set it in other moulds or glasses if you wish). Place in the fridge to chill for at least 4 hours, or until well set.
- To make the honey mousse, lightly whisk the egg yolks and combine in a medium saucepan with the butter, chocolate and honey. Stir over low heat until the chocolate is just melted (be careful not to overheat). Transfer mixture to a large bowl.
- Place the cold water in a small heatproof bowl or dish and sprinkle the gelatin over. Set aside for 5 minutes or until the gelatin is fully rehydrated. Sit the bowl or dish into another bowl of hot water and stir until dissolved and the mixture is clear. Stir gelatin mixture into the chocolate mixture until combined. Cover and cool to room temperature, stirring occasionally.
- Use an electric mixer with a whisk attachment or a hand-held balloon whisk to whisk the cream in a medium bowl until soft peaks form. Fold the cream into the cooled chocolate mixture until just combined. Whisk the egg whites with a clean whisk in a large bowl until soft peaks form. Add half the egg whites into the chocolate mixture and gently fold through. Add the remaining egg whites and gently fold through until just combined.
- Place 18 x 60mm (top measurement) half sphere moulds on a tray and pour in the mousse mixture to fill each until almost full. Remove the lavender jelly domes from the smaller moulds and press into the centre of each individual mousse, ensuring the mousse completely covers the jelly. If the jelly isn't completely covered, add a little more mousse. If necessary, scrape a palette knife across the top of the moulds so that the base of the mousse domes will be level. Chill for at least 4 hours, or until set.
- To make the hazelnut meringue, preheat the oven to 180°C (160°C fan forced). Lightly grease 2 oven trays and line with non-stick baking paper.
- If using whole toasted hazelnuts grind the nuts with 1 tablespoon of the caster sugar in a food processor until fine but still with some texture.
- Use an electric mixer with a whisk attachment to whisk the egg whites and vinegar until soft peaks form. Add the caster sugar 1 tablespoon at a time, whisking well after each addition. Once half the sugar has been added start adding the rest in larger quantities, whisking well after each addition, until stiff, glossy peaks form. Use a metal spoon or spatula to fold the hazelnuts through the meringue. Spoon the meringue onto the prepared trays and spread evenly in a rectangle until about 1-1½cm thick. Bake in preheated oven for 30-40 minutes until a crisp crust forms. Remove from the oven and cool for 20 minutes on the trays and then transfer them to wire racks, still on the baking paper, to cool completely. Carefully remove the baking paper and transfer to a cutting board. Use a 6cm round cutter to cut discs from the meringue sheets. Set aside in an airtight container.
- To make the mirror glaze, place 80ml (1/3 cup) of the cold water into a small bowl or dish and sprinkle the gelatin over. Set aside for 5 minutes or until the gelatin is fully rehydrated.
- Combine the remaining water, sugar and condensed milk in a small saucepan over a medium heat. Stir occasionally until the mixture begins to bubble. Remove from the heat, add the gelatin mixture and stir until fully dissolved. Add the white chocolate chips and stir slowly until melted. Pour the mixture through a sieve into a large jug and set aside to cool to room temperature.
- Remove the petit gateaux domes from the fridge and place on a wire rack over a larger oven tray to catch the drips. Carefully and slowly pour the glaze over ensuring the domes are completely covered. Sprinkle dried lavender on top to decorate if desired.
- Set aside at room temperature for at least 20 minutes or until the glaze is set.
- Use a palette knife to transfer the mousse domes to the hazelnut meringue discs and serve.
Baker's Tips
- The mousse domes will keep in an airtight container in the fridge for up to 2 days.
- The Hazelnut meringue will keep in an airtight container at room temperature for up to 1 week.
Rachel took inspiration for her creation from:
https://www.deliciousmagazine.co.uk/
https://www.womensweeklyfood.com.au/
https://chelsweets.com
https://ballymaloe.ie/content/ballymaloe-recipes
Photography by Alan Benson.
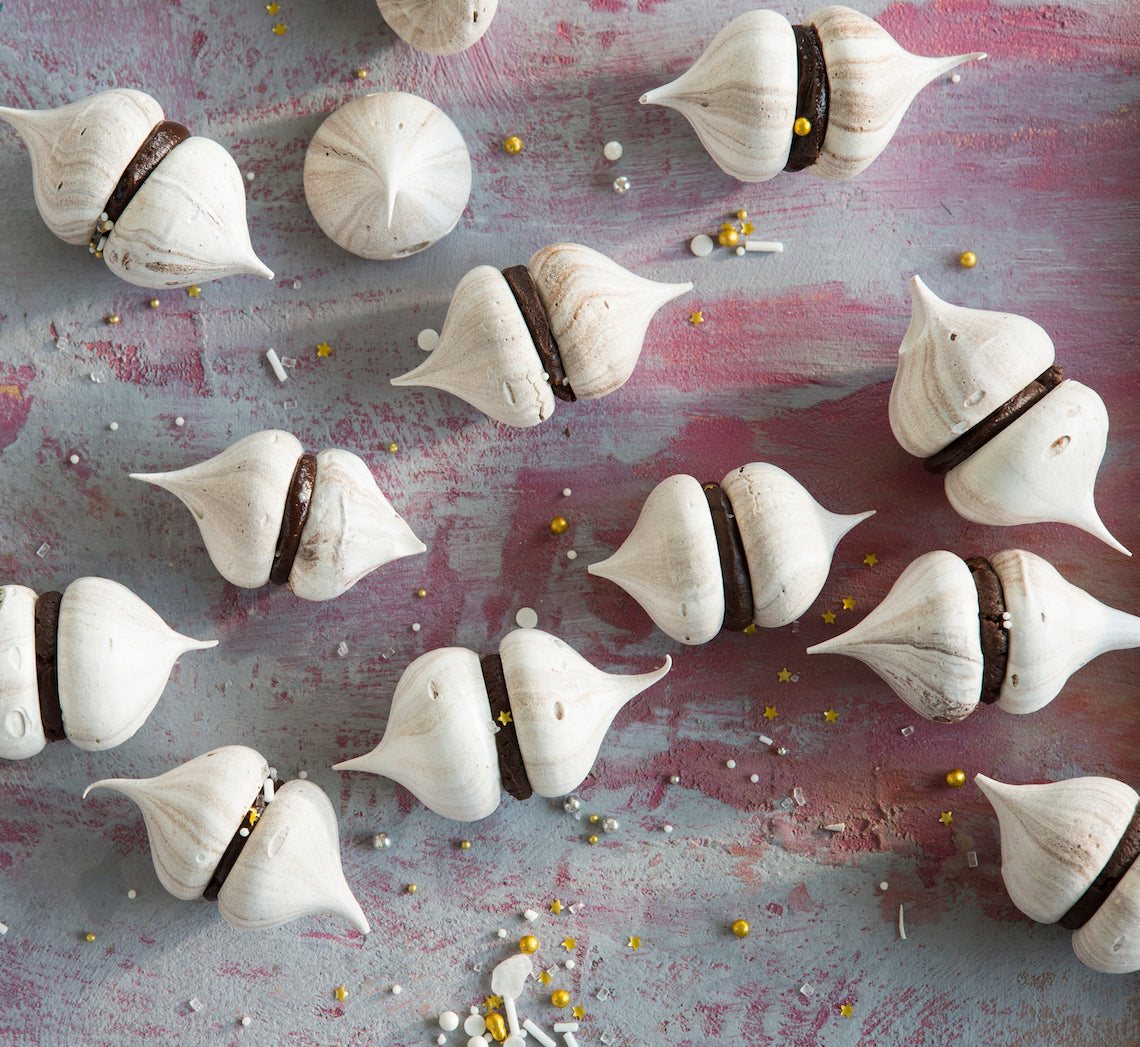
Prep 40min (+1hr cooling and 10min standing time)Bake 1hrMakes 40
These mouthfuls of chocolate sweetness are simply too cute for words! The meringue mixture is made using the Swiss meringue method of heating the egg whites and sugar together over a bain marie until the sugar dissolves and the mixture is hot before whisking. Don’t be tempted to cut the whisking time with this method as the meringue structure won’t be fully formed until it is cooled completely and you will end up with little pools of shapeless meringue on your tray once piped instead of petite ‘kisses’.
Ingredients
Chocolate swirl meringues
4 egg whites, at room temperature
220g (1 cup/7¾oz) caster sugar
1 teaspoon natural vanilla essence or extract
1½ tablespoons Dutch cocoa powder
Caramel ganache
100g (3½oz) good-quality dark (70% cocoa) chocolate, finely chopped
55g (¼ cup/2oz) caster sugar
2 tablespoons water
100ml (3½fl oz) pure (pouring/thin) cream
20g (¾oz) salted butter, cubed
Method
- Preheat oven to 110°C/230°F (90°C/195°F fan-forced). Line a large oven tray with non-stick baking paper.
- Combine the egg whites and sugar in the heatproof bowl and place over a saucepan of simmering water (make sure the bowl fits snugly in the saucepan and the base doesn’t touch the water). Stir with a whisk until the sugar is dissolved completely and the mixture reaches 55°C/130°F on a sugar thermometer.
- Transfer the mixture to the bowl of a stand mixer and whisk with the whisk attachment on medium-high speed for 10 minutes or until very thick and glossy and the mixture has cooled completely to room temperature. Whisk in the vanilla.
- Transfer the meringue mixture to a large wide bowl. Sift the cocoa powder over the top of the meringue mixture and use a spatula to fold the mixture 2-3 times to roughly swirl the cocoa powder through.
- Carefully spoon the meringue into a large piping bag fitted with a plain 11mm/½in (#11) nozzle. Holding the piping tip about 1cm/ ½in from the lined tray, pipe small ‘kisses’ about 3cm/1 ¼in in diameter and 2cm/ ¾in apart onto the tray.
- Bake in preheated oven for 1 hour-1 ¼ hours or until the meringue is crisp and hard to touch, but not coloured. Transfer the meringue kisses immediately (while still warm) to an airtight container lined with absorbent paper, dividing layers with more absorbent paper if necessary.
- Meanwhile, to make the Caramel Ganache, place the chocolate in a heatproof bowl. Combine the caster sugar and water in a small saucepan and use a wooden spoon to stir over low heat until the sugar dissolves. Increase the heat to medium and bring to the boil. Boil for about 10 minutes, brushing down the side of the pan with a pastry brush dipped in water to dissolve any sugar crystals, until the mixture turns a deep caramel. Remove immediately from the heat and carefully add the cream and butter. Stir with a wooden spoon until well combined and the caramel is smooth. Pour the warm caramel over the chocolate and set aside for 1 minute. Stir with a metal spoon until smooth. Set aside at room temperature for 1 hour, stirring occasionally, or until cooled and thickened to a spreadable consistency. (Makes about 200ml.)
- Spread the base of a cooled meringue with a little of the Caramel Ganache and then sandwich with another meringue. Repeat with the remaining meringues and ganache. Set aside for at least 10 minutes for the ganache to firm slightly before serving.
Baker's Tip
- The unsandwiched meringues will keep in an airtight container in a cool, dry place for up to 1 week. Once sandwiched with the ganache they are best eaten the same day, but keep them in an airtight container until serving time.
This recipe is from Anneka's SBS Food online column Bakeproof: Meringue. Click here for more Bakeproof columns and recipes.
Photography by Alan Benson.
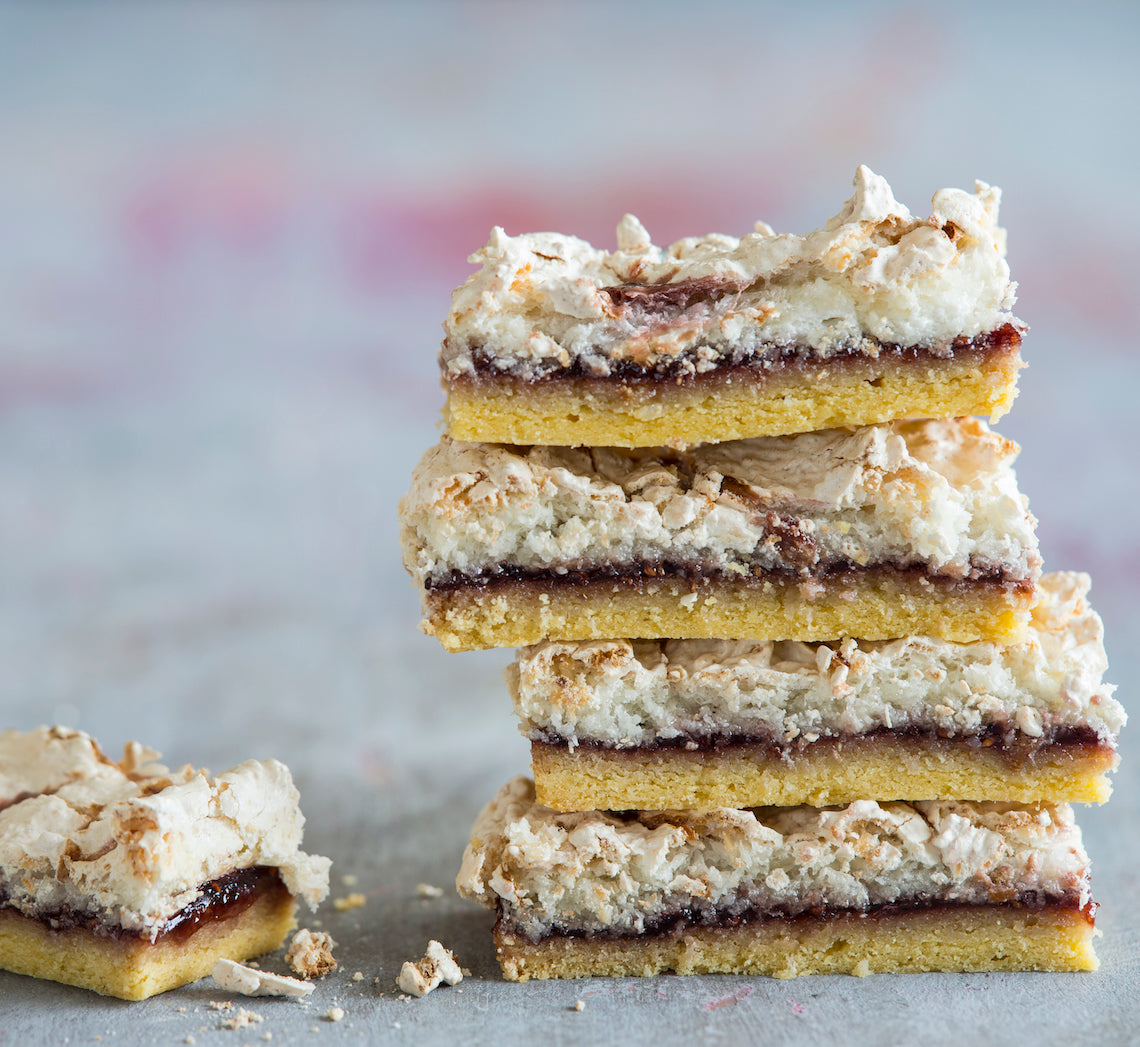
Prep 25min (+1hr cooling time)Bake 40minMakes 16 serves
More a slice than a cake, I can’t believe I have only just discovered this gem from the land of the long white cloud. I can completely understand why it features fondly in the childhood memories for anyone who grew up in rural New Zealand!
Ingredients
Melted butter, to grease
Biscuit Base
100g (3½oz) salted butter, at room temperature
110g (½ cup/4oz) caster sugar
1 teaspoon natural vanilla essence or extract
3 egg yolks
225g (1½ cups/8oz) plain flour
1 teaspoon baking powder
320g (1 cup/11¼oz) good-quality raspberry jam
Coconut Meringue Topping
4 egg whites, at room temperature
220g (1 cup/7¾oz) caster sugar
1 teaspoon natural vanilla extract or essence
135g (1½ cups/4¾oz) desiccated coconut
1 tablespoon good-quality raspberry jam (see Baker's Tips)
Method
- Preheat oven to 180°C/350°F (160°C/215°F fan-forced). Grease a 20cm x 30cm (8inx12in) slice tin with melted butter to grease and line the base and sides with one piece of non-stick baking paper, cutting into the corners to fit and allowing the paper to overhang the sides.
- To make the Biscuit Base, use an electric mixer fitted with a paddle beater to beat the butter, sugar and vanilla until pale and creamy. Beat in the egg yolks until well combined. Sift together the flour and baking powder, add to the butter mixture and beat on low speed until just combined.
- Press the biscuit base mixture into the prepared tin to cover evenly. Bake for 10 minutes or until starting to colour (the base won’t be cooked through at this stage). Remove from the oven and spread evenly with the raspberry jam. Set aside to cool slightly.
- Meanwhile, use an electric mixer with a whisk attachment to whisk the egg whites in a large clean, dry mixing bowl on medium-high speed until soft peaks form. Add the sugar, a spoonful at a time, whisking well on medium-high speed after each addition. Continue to whisk until the mixture is thick and glossy, the sugar has dissolved and a trailing peak forms when the whisk is lifted. Whisk in the vanilla and then use a spatula or large metal spoon to fold in the coconut until evenly combined. Spread the meringue mixture over the raspberry jam to cover. Dot the 1 tablespoon of jam over the top of the meringue and then use a tooth pick or skewer to swirl it through the meringue mixture.
- Return the slice to the oven and bake for 30 minutes or until golden and crisp to touch on top. Place on a wire rack and allow the slice to cool in the tin (about 1 hour).
- Use the paper to transfer the slice from the tin to a cutting board. Cut into portions to serve.
Baker's Tips
- Although raspberry jam is traditionally used in this slice, any berry jam can be used - mixed berry, strawberry and blackberry all work well.
- This slice will keep in an airtight container at room temperature in a cool spot for up to 4 days.
This recipe is from Anneka's SBS Food online column Bakeproof: Meringue. Click here for more Bakeproof columns and recipes.
Photography by Alan Benson.
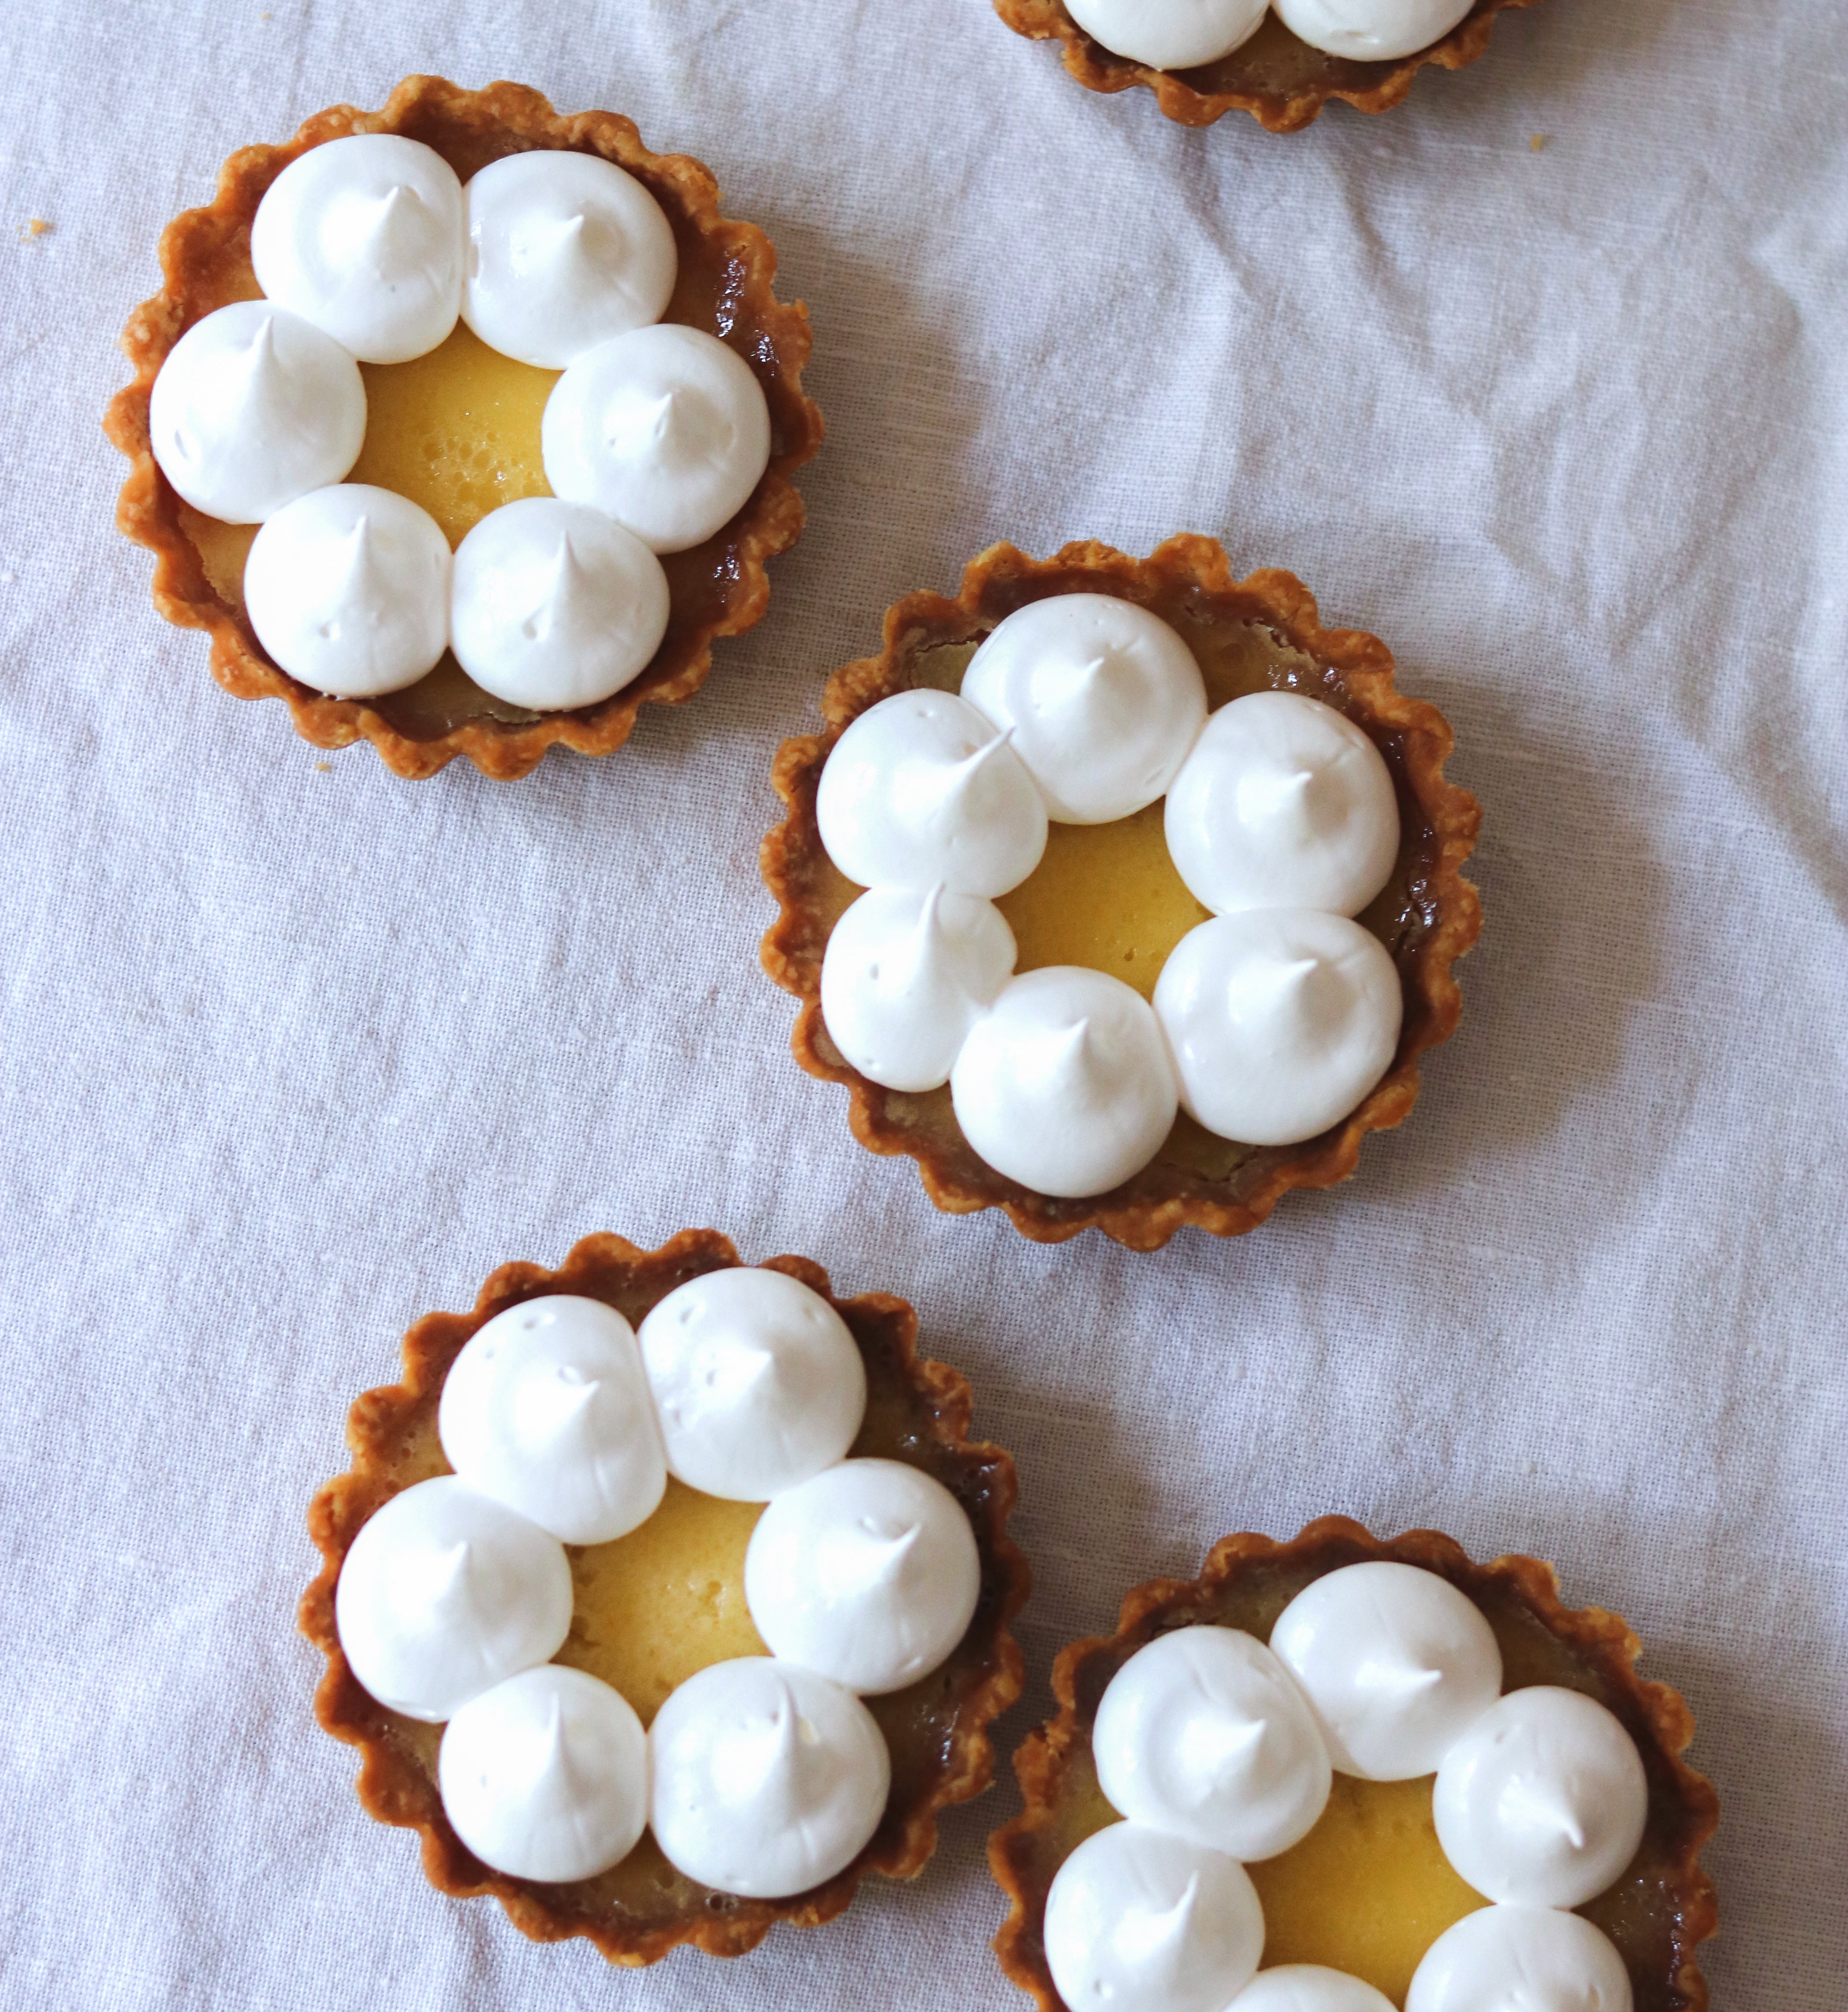
Prep 40min (+ pastry making time)Bake 35minMakes 10
Italian meringue makes an elegant topping for these classic tarts. You can caramelize the meringue lightly with a blow torch to add a delicate, slightly burnt caramel flavour to complement the sweetness of the meringue and sourness of the lemon filling if you wish.
Ingredients
1 quantity Sweet Shortcrust Pastry, rolled into a log about 15cm long before wrapping and chilling as directed
Icing sugar (optional), to sprinkle
Cream or ice cream, to serve
Filling
2 eggs110g (½ cup) caster sugar
125ml (½ cup) pouring (thin) cream
100ml strained fresh lemon juice
Italian Meringue
4 egg whites, at room temperature220g (1 cup) caster sugar
60ml (¼ cup) water
Method
-
Preheat the oven to 200°C (180°C fan-forced).
-
Remove the pastry from the fridge and cut into 10 even slices. Gently pat a pastry portion on a lightly floured benchtop with the palm of your hand to fatten slightly. Use a lightly floured rolling pin to roll out to a disc about 3mm thick. Line a 6.5cm (base measurement), 2cm deep, tart tin with removable base, with the pastry, pressing it into the side and corners with your thumb and/or fingertips. Roll the rolling pin over the top of the tart tin to trim any excess pastry. Repeat with the remaining pastry portions to make 10 tart cases in total.
-
Place the tart cases on an oven tray. Use a fork to prick the pastry base of each about 4 times. Line the pastry cases with squares of greaseproof paper or foil and fill with pastry weights, dried beans or raw rice, making sure they press into the corners and fill the cases. Bake in preheated oven for 10 minutes.
-
Remove the tart cases from the oven and use the paper or the foil to remove the weights from the cases. Return the cases to the oven and bake for a further 5-10 minutes or until the pastry is just cooked through and looks dry.
-
Meanwhile, to make the filling, use a fork to whisk the eggs, sugar, cream and lemon juice together until well combined. Strain the mixture into a jug. Pour the filling into the hot pastry cases while still in the oven (see Baker's Tips), dividing evenly. Reduce the oven temperature to 160°C (140°C fan-forced) and bake for a further 10 minutes or until the filling has just set in the centre but still wobbles slightly when shaken. Cool the tarts in the tins.
-
To make the Italian Meringue, put the egg whites in the bowl of a stand mixer fitted with a whisk attachment. Combine the sugar and water in a small saucepan and stir with a wooden spoon over low heat until the sugar dissolves. Increase the heat to medium and bring to the boil. Boil for about 10 minutes, occasionally brushing down the side of the pan with a pastry brush dipped in water to dissolve any sugar crystals, until the syrup reaches hard ball stage (120°C on a sugar thermometer).
-
Meanwhile, just before the syrup is ready, whisk the egg whites on high speed until firm peaks form. Remove the syrup from the heat and stand for a bout 1 minute or until the bubble subside. With the motor running on high speed, gradually add the sugar syrup in a thin steady stream until all the syrup has been incorporated. Continue to whisk on medium speed for another 10 minutes or until the meringue has cooled to room temperature.
-
Spoon the meringue mixture into a large piping bag fitted with a #13 (1.3cm) plain or #11 (1.1cm) star nozzle. Pipe small rounds of meringue over the surface of the tarts to cover. Use a blow torch to lightly caramelize the meringue if desired.
-
Dust with icing sugar, if desired and serve with cream or ice cream.
Baker's Tips
- Adding the filling to the pastry cases while still sitting in the oven will mean you can fill the tarts completely and minimise the chance of it spilling when transferring it to the oven.
- These tarts will keep in an airtight container in the fridge for up to 2 days (although the pastry will soften slightly on keeping). Bring to room temperature to serve.
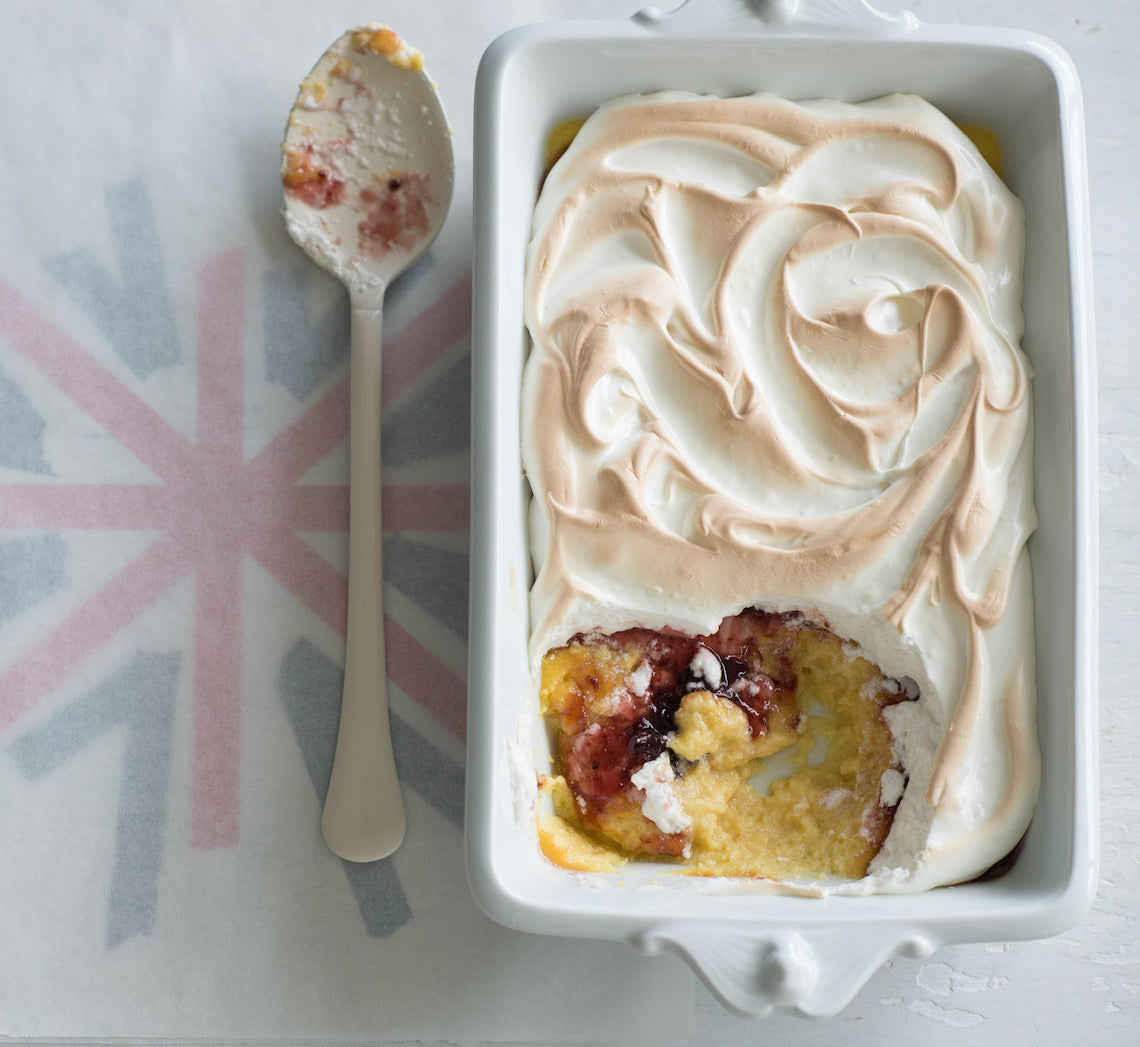
Prep 25minBake 30-35minMakes 8-10 serves
This traditional English pudding is quintessential nursery food – nurturing, soul-warming and economical. Feel free to replace the mixed berry jam with raspberry, plum or strawberry to ensure the sweet but subtle middle layer suits your tastes.
Ingredients
500ml (2 cups/17fl oz) milk
55g (¼ cup/2oz) caster sugar
30g (1 oz) salted butter, diced
Finely grated zest of 1 lemon
5 egg yolks (from 60g/2oz eggs), at room temperature
2½ teaspoons natural vanilla essence or extract
150g (2½ cups, lightly packed/5¼oz) fresh white breadcrumbs
85g (¼ cup/3oz) mixed berry jam (see Baker’s Tips)
1 tablespoon icing sugar, to dust
Meringue Topping
3 egg whites (form 60g/2oz eggs)
Large pinch of salt
110g (½ cup/4oz) caster sugar
1 teaspoon natural vanilla extract or essence
Method
- Put the milk, sugar, butter and lemon zest in a medium saucepan and stir over medium heat until the sugar dissolves and the butter melts. Use a balloon whisk to whisk the egg yolks in a medium heatproof bowl until smooth. Gradually add the warm milk mixture, whisking constantly until well combined. Stir in the vanilla and breadcrumbs.
- Pour the custard mixture into a shallow 1-litre (4-cup/1.75pt) ovenproof dish. Set aside for 15 minutes for the bread to soak up some of the custard.
- Preheat oven to 170ºC/340°F (150ºC/300°F fan-forced).
- Place the ovenproof dish into a roasting pan or larger ovenproof dish. Add enough boiling water to the roasting pan or larger ovenproof dish to reach halfway up the sides of the dish with the custard mixture to create a water bath or bain-marie.
- Bake in preheated oven for 20-25 minutes or until the custard has almost set but still wobbles slightly when touched on the top. Remove from the oven and remove the custard dish to a wire rack. Set aside for 20 minutes or until cooled slightly (stop here if pre-preparing your pudding, see Baker's Tips).
Increase the oven temperature to 190ºC/375°F (170ºC/340°F fan-forced).
- To make the Meringue Topping, use an electric mixer with a whisk attachment to whisk the egg whites and salt on medium-high speed until soft peaks form. With the motor running, gradually add the sugar, a spoonful at a time, and whisk until the sugar has dissolved completely and the mixture is thick and glossy. Whisk in the vanilla.
- Carefully spread the jam over the top of the custard (see Baker's Tips). Spread the Meringue Topping over the jam to cover, swirling as desired.
- Bake in preheated oven for 10 minutes or until the meringue is lightly golden (see Baker’s Tips). Serve immediately.
Baker's Tips
- You can cover the bottom of the roasting pan or larger ovenproof dish with a folded tea towel to stop the dish with the custard sliding around when transferring it to and from the oven.
- You can make this pudding up to the end of step 4 (note in method) up to 2 days before serving. Stand the puddings at room temperature for 30 minutes before continuing with the recipe.
- If your jam is a little thick you can warm it in a small saucepan over a low heat, stirring often, until runny, to make it easier to spread.
- You can caramelise the meringue topping with a blowtorch instead of baking it a second time for a more ‘dramatic’ effect if you wish.
This recipe is from Anneka's SBS Food online column, Bakeproof: Best of British Baking.
CLICK HERE for more Bakeproof recipes.
Photography by Alan Benson.
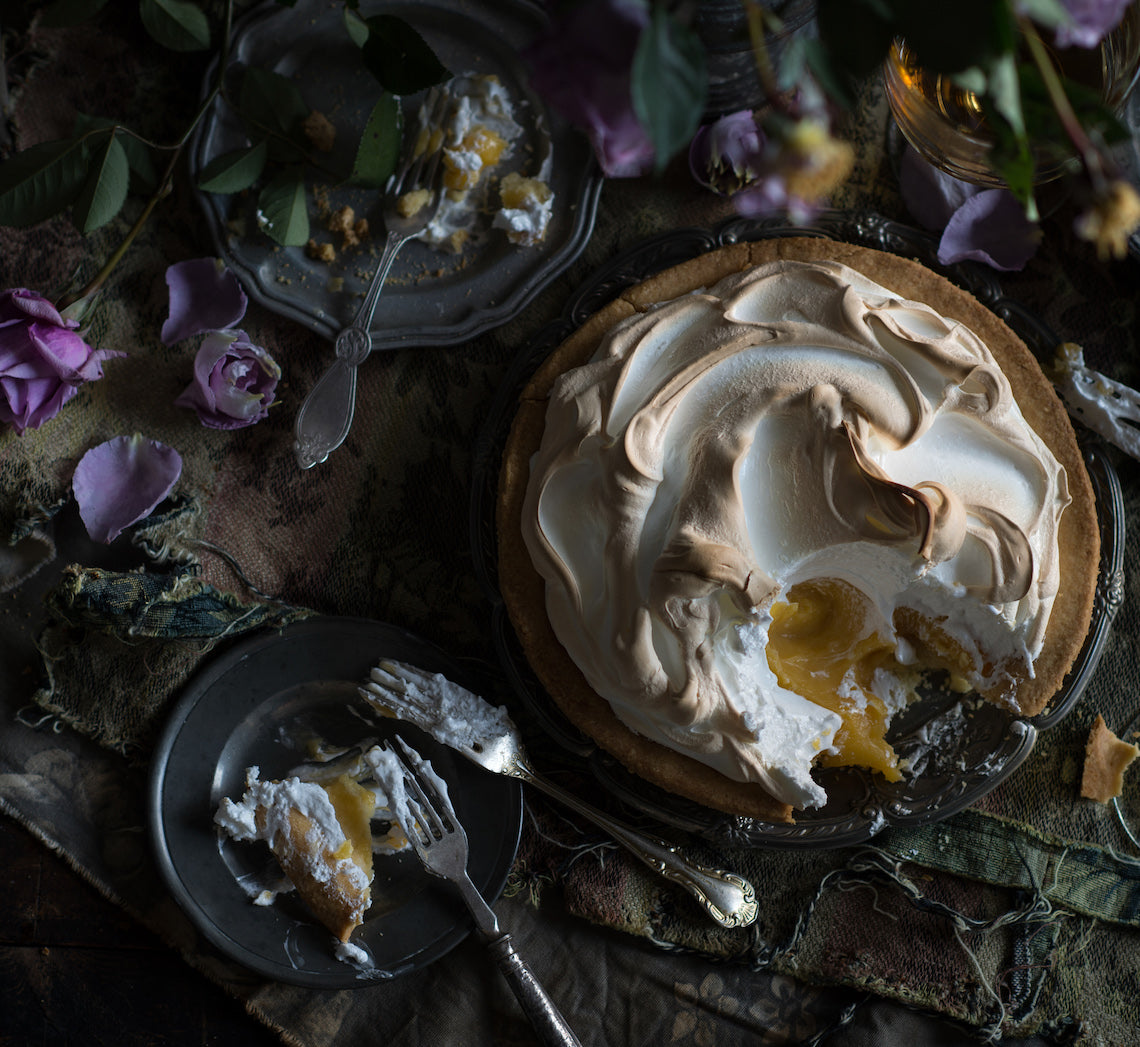
Prep 40min (+pastry making, 30min cooling and 2hr chilling time)
Bake 45-55minMakes 8-10 serves
Sometimes known as lemon chester pudding, lemon meringue pie is a wonderful combination of short, buttery pastry, a tart custard filling and a sweet, fluffy meringue topping. This recipe won’t disappoint!
Ingredients
1 quantity sweet shortcrust pastry, shaped into a disc before wrapping and chilling
Lemon Filling
40g (⅓ cup) cornflour, sifted
200ml strained freshly squeezed lemon juice
80ml (⅓ cup) water
220g (1 cup) caster sugar
6 egg yolks
100g salted butter, diced
Italian Meringue Topping
4 egg whites
220g (1 cup) caster sugar
80ml (1/3 cup) water
Pinch of salt
Method
- Preheat oven to 200°C (180°C fan-forced).
- Use a lightly floured rolling pin to roll out the pastry on a lightly floured bench top to a round about 3mm thick. Line an ungreased 22cm diameter (base measurement), 3cm deep pie plate or tart tin with the pastry. Use a small sharp knife to trim any excess pastry.
- Place the pastry case on an oven tray and use a fork to prick the base about 12 times. Line the pastry case with crumpled baking paper or foil and fill with pastry weights or raw rice, making sure they fill the case. Bake in preheated oven for 20 minutes.
- Remove the pastry case from the oven and use the paper or the foil to lift the weights out of the case. Return the case to the oven and bake for a further 20-25 minutes or until the pastry is cooked through and is golden. Set aside to cool.
- To make the Lemon Filling, place the cornflour in a medium saucepan. Use a balloon whisk to gradually stir in the combined lemon juice and water until smooth and well combined. Stir in the sugar, egg yolks and butter. Stir over medium heat for 3-5 minutes or until the butter melts. Continue to stir over medium-low heat for 5-10 minutes or until the mixture thickens and comes to a simmer. Pour immediately into the pastry shell and use the back of a metal spoon to smooth the surface. Set aside for 30 minutes to cool. Cover and chill for at least 2 hours or until the filling is set.
- When ready to serve, preheat oven to 240°C (220°C fan-forced).
- To make the Italian Meringue Topping, put the egg whites in the bowl of a stand mixer fitted with a whisk attachment. Combine the sugar and water in a small saucepan and stir with a wooden spoon or spatula over low heat until the sugar dissolves. Increase the heat to medium and bring to the boil. Boil for about 10 minutes, occasionally brushing down the side of the pan with a pastry brush dipped in water to dissolve any sugar crystals, until the syrup reaches soft ball stage (115°C on a sugar thermometer). Meanwhile, just before the syrup is ready, whisk the egg whites on high speed until firm peaks form. Remove the syrup from the heat and stand for about 1 minute or until the bubble subside. With the motor running on high speed, gradually add the sugar syrup in a thin steady stream until all the syrup has been incorporated. Add the salt and then continue to whisk on medium speed for another 10 minutes or until the meringue has cooled to room temperature.
- Spread the meringue mixture over the top of the lemon filling, swirling as desired. Bake in preheated oven for 5-10 minutes or until browned on the edges (see Baker’s Tips). Stand for 5 minutes before scooping with a large metal spoon or cutting into wedges with a sharp knife that has been dipped in hot water (see Baker’s Tips).
Baker's Tips
- This pie is best eaten the day it is made.
- If using a tart tin, you can transfer the pastry case to a ovenproof serving plate before adding the filling.
- You can also use a blowtorch to caramelise the meringue topping instead of returning it to the oven in step 7.
- Dipping the spoon or knife in hot water and drying before scooping or cutting will make it easier to portion.
This recipe is from Anneka's SBS Food online column, Bakeproof: Citrus.
CLICK HERE for more Bakeproof recipes.
Photography by Alan Benson.
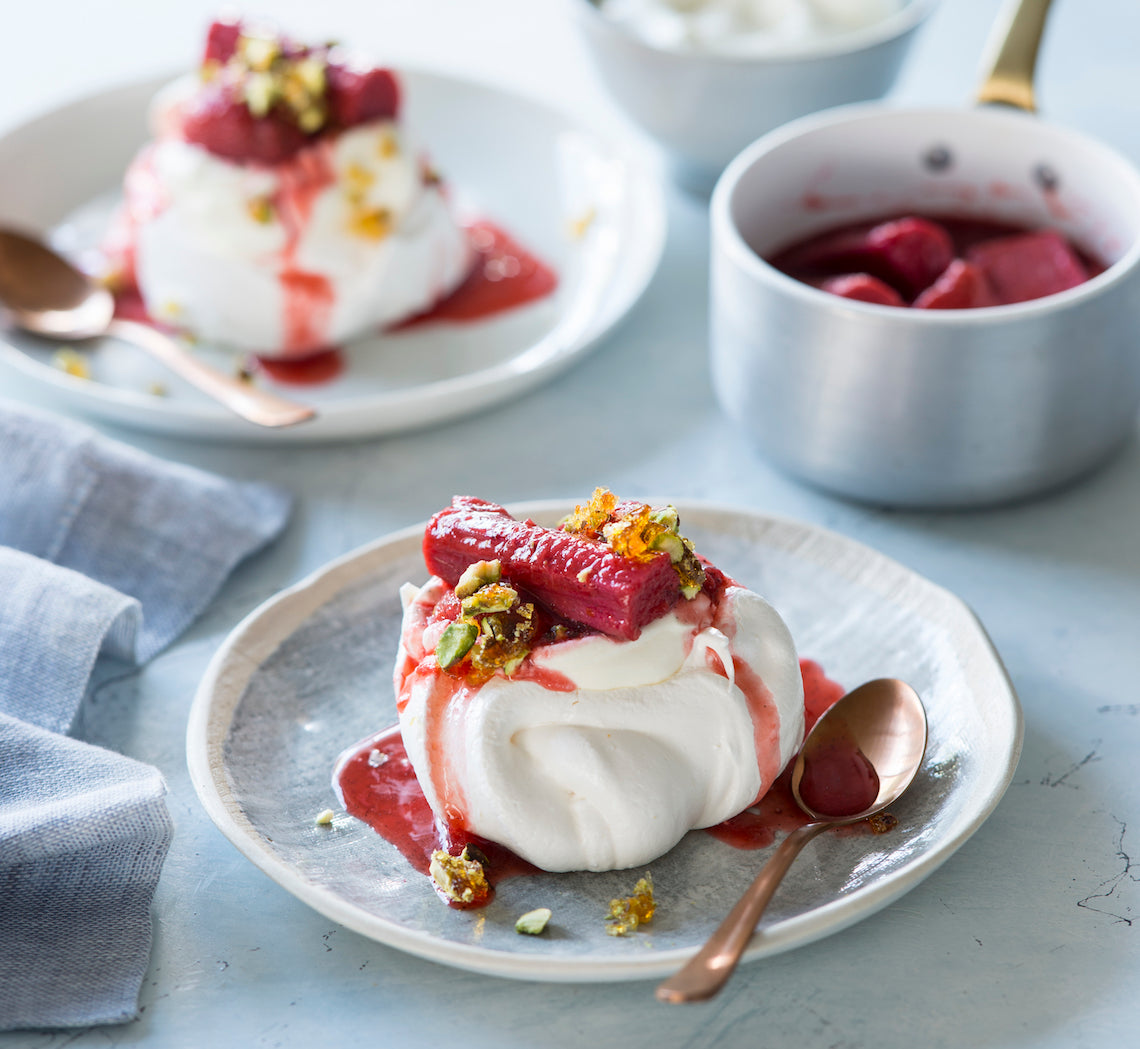
Prep 1hr (+2hr cooling time)
Bake 1hr 35minMakes 8 serves
Delicately flavoured with rosewater, these individual pavlovas make a divine create-your-own dessert. Those who prefer a slightly more casual approach to assembly can opt for an Eaton mess. Simply crush the pavlovas and layer the individual elements in a glass instead!
Ingredients
lime wedges, to serve
Rosewater pavlovas
3 egg whites, at room temperature
165g (¾ cup) caster sugar
2 teaspoons cornflour, sifted
2 teaspoons rosewater
Vanilla-roasted red fruits
500g trimmed rhubarb (about 2 bunches), cut into 6 cm lengths
2 x 250g punnets small strawberries, hulled
2 vanilla beans, split lengthways
150g (⅔ cup) caster sugar
Yoghurt cream
125ml (½ cup) thickened cream, whipped to firm peaks
130g (½ cup) thick Greek-style natural yoghurt
Toffee pistachios
110g (½ cup) caster sugar
60ml (¼ cup) water
75g unsalted pistachio kernels, toasted
Method
- To make the rosewater pavlovas, place the oven rack in the lower third of the oven and preheat it to 110°C. Line an oven tray with non-stick baking paper. Use an electric mixer with a whisk attachment to whisk the egg whites in a large bowl on medium-high speed until soft peaks form. With the motor running, add the sugar a spoonful at a time, whisking well after each addition, until all the sugar has dissolved and the mixture is very thick and glossy (this will take 4-5 minutes). Add the cornflour and rosewater and whisk to combine. Use a spatula to stir the meringue mixture to ‘loosen’ it slightly (this will get rid of any excess air in the mixture and give it a smoother, less ‘foamy’ texture). Use two metal tablespoons to spoon 8 ovals of the meringue mixture on to the lined tray and use the back of a spoon to make in an indent in the centre of each. Bake in the lower third of the preheated oven for 1 hour 15 minutes, until the meringue is crisp and hard to touch, but not coloured. Turn off the oven, leave the door slightly ajar and cool it completely in the oven (this will take about 2 hours).
- To make the toffee pistachios, line an oven tray with non-stick baking paper. Combine the caster sugar and water in a small saucepan and use a wooden spoon to stir over low heat until the sugar dissolves. Increase the heat to medium and bring to the boil. Boil for 8-10 minutes, brushing down the side of the pan with a pastry brush dipped in water to dissolve any sugar crystals, until the mixture turns a deep caramel. Pour immediately onto the lined tray and then sprinkle with the pistachios. Lightly tap the tray 2-3 times on the bench top to settle the pistachios into the toffee and then set aside to cool completely (this will take about 30 minutes). When cool, use the end of a rolling pin to pound the toffee into coarse chunks.
- To make the vanilla-roasted red fruits, preheat the oven to 200°C (180°C fan-forced). Rinse the rhubarb and shake off any excess water. Place in a bowl with the strawberries and sugar. Use a small sharp knife to scrape the seeds from the vanilla bean. Add the bean and the seeds to the rhubarb mixture and toss to combine. Transfer to an ovenproof dish just large enough to hold the fruit in a single layer and cover with foil. Bake in preheated oven for 18-20 minutes or until the rhubarb is just tender and still holding its shape. Remove the foil and set aside to cool.
- To make the yoghurt cream, fold together the whipped cream and yoghurt.
- To serve, place the pavlovas, toffee pistachios, roasted fruit, yoghurt cream and lime wedges in the centre of the table for guests to assemble their own dessert.
Baker's Tips
- The rosewater pavlovas will keep in an airtight container at room temperature for up to 1 week.
- The vanilla-roasted red fruit will keep in an airtight container in the fridge for up to 3 days. Serve at room temperature.
- The toffee pistachios will keep in a sealed jar or airtight container at room temperature for up to 1 month. You may have to pound again to break up before serving.
Photography by Alan Benson. Styling by Jane Hann.
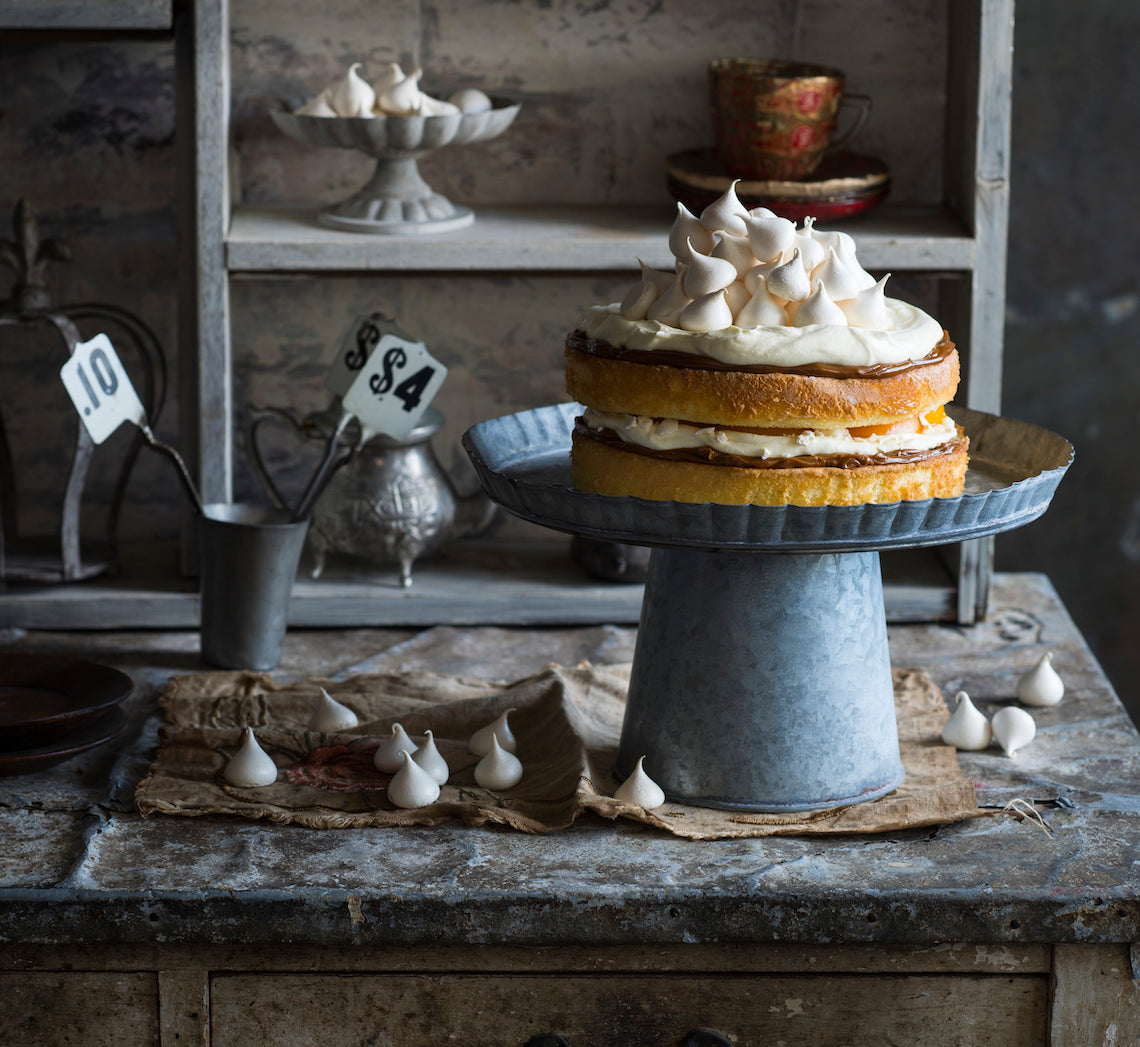
Prep 1hr15min (+2hr chilling and 1hr cooling time)Bake 1hr20minMakes 10 serves
This blissful combination of sponge cake, cream, meringue, dulce de leche and peaches takes its name from a native Uruguayan bird – apparently the meringues resemble the features of a chaja bird. I must admit I find it hard to see the resemblance and feel this wonderful cake has been dealt a slight disservice in its naming!
Ingredients
400g (14oz) tin sliced peaches in juice
55g (¼ cup/2oz) caster sugar
2 tablespoons peach-flavoured liqueur or schnapps
300ml (10¼fl oz) thickened cream
1 teaspoon natural vanilla essence or extract
2 x 20cm/8in sponge cakes
225g (¾ cup/8oz) dulce de leche, warmed gently to a spreadable consistency
Meringues
2 egg whites (from 60g/2oz eggs)
110g (½ cup/4oz) caster sugar
1 teaspoon vanilla essence
Method
- To make the Meringues, combine the egg whites and sugar in a medium heatproof bowl (preferably metal) and place over a saucepan of simmering water, ensuring the bowl doesn’t touch the water. Stir with a spatula or small whisk until the sugar dissolves and the mixture is hot to touch (about 55-60°C on a sugar thermometer). Be careful not to allow the egg whites to cook.
- Transfer the egg white mixture to the bowl of an electric mixer (see Baker’s Tips). Whisk the egg white mixture with a whisk attachment on medium-high speed until very thick and glossy and the mixture has cooled to room temperature. Whisk in the vanilla and cornflour.
- Fill a large piping bag fitted with a 4B star (or #11/11mm/½in round) piping nozzle with the meringue mixture. Holding the piping nozzle about 1cm/½in above the tray, pipe small rosettes (or 'kisses') about 2.5cm/1in in diameter and 2cm apart on the lined tray.
- Bake in a preheated oven for 60-70 minutes or until the meringues are crisp, hard to touch and peel away from the tray easily, but are not coloured. Remove the meringues from the oven and place immediately in an airtight container lined with absorbent paper.
- Drain the peach slices, reserving 100ml (3½fl oz) of the juice. Set the peach slices aside. Combine the reserved juice in a small saucepan with the sugar and stir over low heat until the sugar dissolves. Bring to a simmer and simmer gently for 2 minutes to reduce slightly. Remove from the heat and stir in the peach-flavoured liqueur or schnapps.
- Use an electric mixer with a whisk attachment on medium-low speed or a balloon whisk to whisk the cream and vanilla until soft peaks form.
- To assemble the cake, turn the sponge layers upside down and brush with half the peach syrup. Turn the sponges right side up and brush with the remaining syrup. Place one layer on a serving plate and spread with half the dulce de leche. Spread with half of the whipped cream. Crumble over about 12 of the meringues and then top with the reserved peach slices. Cover with the remaining sponge layer. Spread the top with the remaining dulce de leche and then the remaining cream. Decorate the top with the remaining meringues. Serve immediately.
Baker's Tips
- The assembled cake, without the meringues on top, will keep in the fridge for up to 3 hours before serving. Stand at room temperature for 30 minutes before serving.
- The fan-forced setting is often too intense for baking meringues and will cause them to crack. If this is the case with your oven, opt for the conventional setting. However, if the meringues do crack when using the convention setting, your oven may be running a little hot and next time reduce the temperature by 5-10°C (41-50°F) as this will often help prevent them from cracking.
- If you don't have a small bowl for your mixer, first whisk the egg white mixture with a balloon whisk until it is foamy and doubled in volume before whisking with the stand mixer. This will make the whisking of the egg white mixture more efficient in a standard size bowl.
- Allowing the egg white mixture to come to room temperature before whisking will reduce the time it will take to whisk it to a meringue.
- The meringues will keep in an airtight container at room temperature for up to 1 week.
This recipe is from Anneka's SBS Food online column, Bakeproof: Latin American Cakes.
CLICK HERE for more Bakeproof recipes.
Photography by Alan Benson.


